Intelligence - Tutorial: Submit labeled data to TeleBureau
NOTE:
To enable TeleBureau for your account, contact our Customer Support Team.
Submitting labeled data to TeleBureau helps Telesign better identify fraud patterns specific to you and other customers and create new Intelligence rules that improve fraud detection. Labeled data is a set of records indicating that a specific transaction with a phone number was fraudulent, not fraudulent, or unknown (referred to as bad, good, or unknown). The more information you include, such as email, IP address, and device identifier (ID), the easier it is for Telesign to detect additional data patterns.
You can submit labeled data to TeleBureau using TelePortal.
Enroll in the TeleBureau program
You must be enrolled in the TeleBureau program to benefit from TeleBureau services. To get started, contact our Customer Support Team.
Roles and permissions
Access to TeleBureau Labeled Data screens (Submit Labeled Data Events screen and Search My Labeled Data Events screen) is limited to two roles:
- Administrator
- Developer
An Administrator has the following privileges:
- View Labeled Data Events
- Edit Labeled Data Events
A Developer has the following privileges:
- View Labeled Data Events
You can only see labeled data events for your organization at either the organization level, or at the level of a specific account, depending on your settings. If you need assistance with privileges, contact our Customer Support Team.
Submit labeled data events
After you enroll in the TeleBureau program, you can submit labeled data events. How to submit an individual event, or a batch of events in discussed in the following sections:
- Navigate to the submit labeled data screen
- Submit data for a single event
- Submit labeled data using a file
Navigate to the Submit Labeled Data screen
This section describes how to submit your labeled data to TeleBureau. Do the following:
- Sign in to
teleportal.telesign.comusing your account information. - From the menu items at the top of the screen when you sign in, select TeleBureau. A drop-down menu appears offering a list of choices.
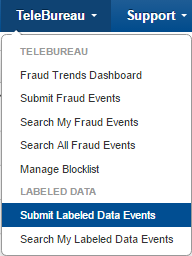
- Select Submit Labeled Data Events. The Submit Labeled Data screen appears. The screen offers two options for submission:
- Single - Submit the data for a single event
- File - Submit the data for a batch of events
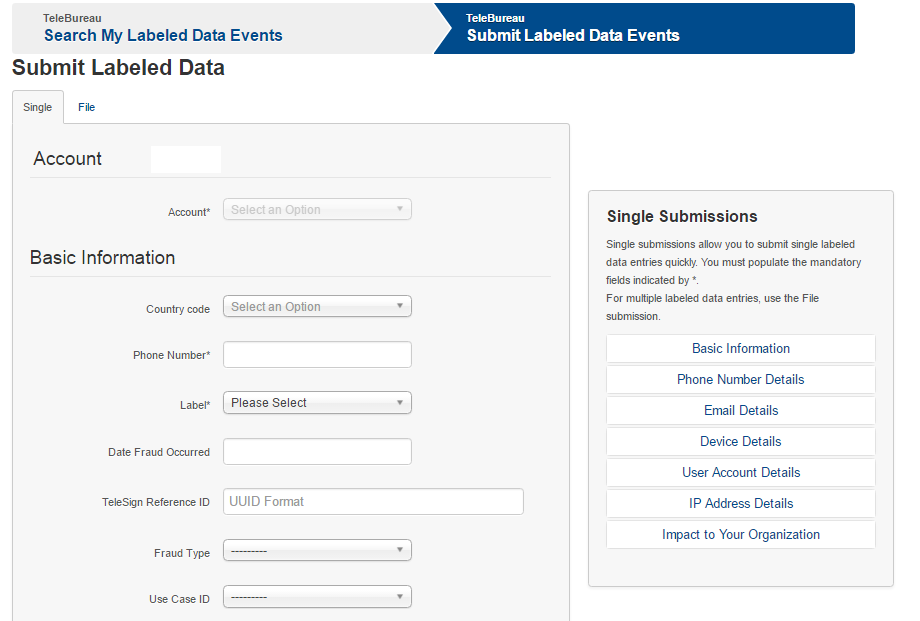
Each option is discussed in its own section:
- Submit data for a single event
- Submit labeled data using a file
Submit data for a single event
The Single tab is the default tab that opens when you navigate to the Submit Labeled Data screen.
Using a series of drop downs, enter as much information as you can for each of the following categories:
- Account
- Basic Information
- Phone Number Details
- Email Details
- Device Details
- User Account Details
- IP Address Details
- Impact to Your Organization
If you are unsure of what information to provide for one of the fields, or whether the field is optional, you can use the Single Submissions box on the right side of the screen to find out more about what to enter for each field.
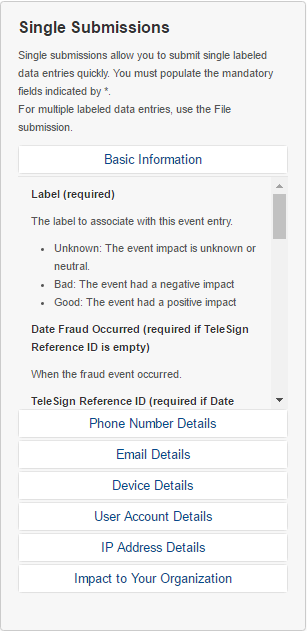
In the Single Submissions box, click on the section you need help with, and you can see details about what each field is.
When you are done filling out the data for your single event submission, select Submit at the bottom of the screen. You can also cancel your event submission by selecting Cancel. If you do this, you are taken directly to the Search My Labeled Data Events screen.
If you want details about all of the fields without looking at the Single Submissions box, they are each described in the Single Submissions Field Descriptions section.
Submit labeled data using a file
- On the Submit Labeled Data screen, select the File tab.
- You must properly format a CSV file with your data prior to submitting it. For instructions about how to set up your file, read the information presented in the File Submissions box on the right side of the screen.
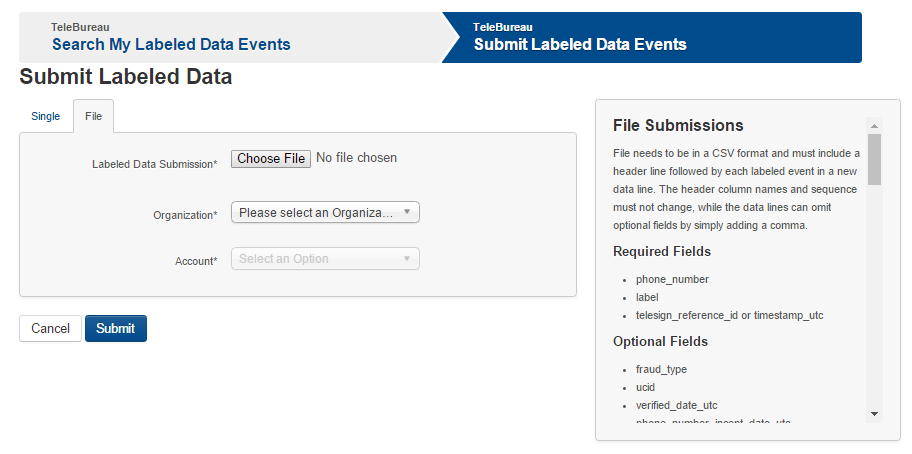
- When you have followed all the instructions in the File Submissions box and have your file ready, you can submit it by clicking Choose File.
- Browse for the correct file and select Open to upload it.
- Use the Organization drop-down to choose your organization.
- Use the Account drop-down to choose your account.
- Select Submit.
For more information about formatting rules, and the available fields, refer to section File Submissions Field Descriptions.
Search My Labeled Events
This section describes how to search for labeled events and submissions and generate reports. Do the following:
- Sign in to
teleportal.telesign.comusing your account information. - From the menu items at the top of the screen when you sign in, select TeleBureau. A drop-down menu appears offering a list of choices.
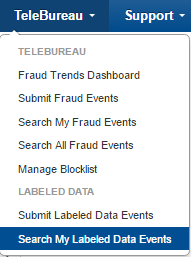
- Select Search My Labeled Data Events. The Search My Labeled Events screen appears on the Events tab by default.
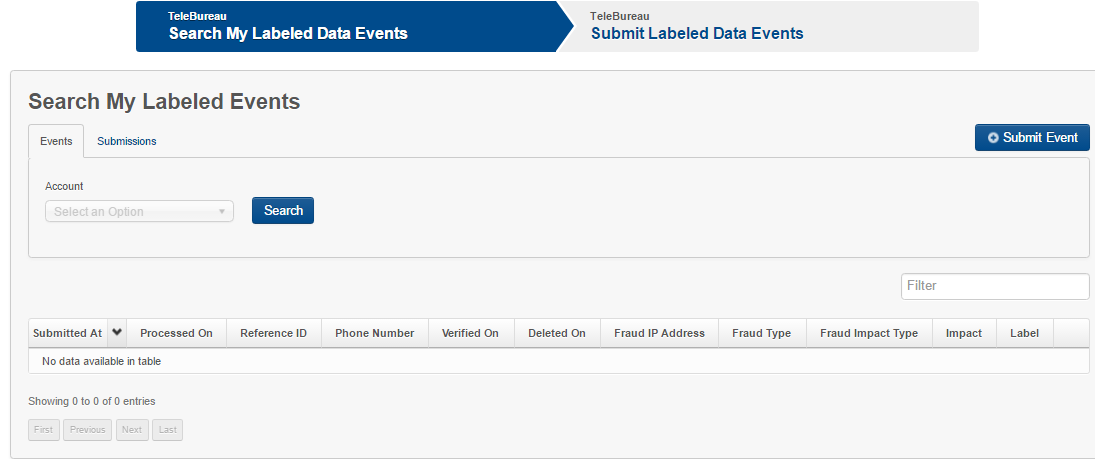
Each tab is discussed in its own section:
- Events
- Submissions
Events
The Events tab allows you to search through previously submitted labeled events data and generate reports.
- Using the drop-downs for Organization and Account, choose the organization and account for that organization that you want to search labeled events for.
- Select Search. If data is available for you to view, it is returned in the table at the bottom of the page. You can use the First, Previous, Next, and Last buttons to move through the pages of data. You can filter the data using the Filter box just above the table on the right. You can also filter data using the arrow next to each column title.
- When you have filtered the data the way you want, select Download to download a report containing your filtered results.
NOTE:
At any time, you can select Submit Event and you are taken immediately to the Submit Labeled Data Events screen, where you can submit a single event or batch of events.
Submissions
The Submissions tab allows you to search through previously submitted submissions. If you have access to more than one account for your organization, you can use the drop-down to choose the account you want to search for submissions with. Otherwise, your account populates the drop-down. Select Search to see a returned table displaying previous submissions.

Single Submissions field descriptions
You can see all the field descriptions and instructions for single submissions of labeled data in TelePortal in the Single Submissions box on the right side of the screen. However, if you want to review all the fields in documentation form instead, they are presented here for reference.
Account
The Account section provides a drop-down that lets you choose the account within your organization that you want to submit data for. Choices presented are dependent on your role and privileges. This field is required.

NOTE:
The Account section may not appear if you are a user with account level administrator privileges for only a single account.
Basic Information
The Basic Information section of the Single Submissions form is where you provide general details such as when the event occurred and what kind of issue was encountered.
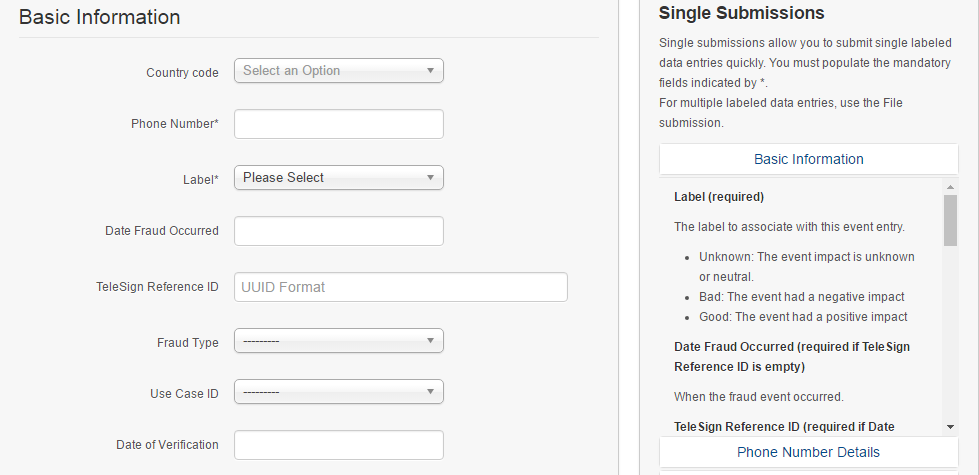
On the Single tab of the Submit Labeled Data screen, the fields for Basic Information are as follows:
- Country code - Use the drop-down to select the country code for the phone number associated with the event you are submitting.
- Phone Number (Required) - Enter the phone number associated with the event you are submitting. This should be entered as cleanly as possible, meaning no special characters or spaces, just the number.
- Label (Required) - A label is used to indicate the event impact. You can choose from:
- Unknown - The event impact is unknown or neutral.
- Bad - The event had a negative impact.
- Good - The event had a positive impact.
- Date Fraud Occurred (required if Telesign Reference ID is empty) - Use the pop-out calendar to indicate the date, hour, minute, second, and time zone the event occurred at. When you finish entering the information select Done.
- Telesign Reference ID (required if Date Fraud Occurred is empty) - Enter the Telesign refid that correlates to this event, using UUID format.
- Fraud Type (optional) - Use the drop-down to choose type of fraud that occurred.
- Account Takeover - The user hacked into another user's account.
- Chargeback - The user got their credit card company to stop payment after receiving merchandise purchased online.
- Coupon/Freebie Abuse - The user took advantage of a sales promotion multiple times by opening several accounts.
- Harassing Behavior - The user just played around and wasted our time, or was just difficult to deal with.
- Identity Theft - The user attempted to open an account using someone else's identity (name, address, Social Security Number)
- Property Damage - The user caused physical damage to our property.
- Spam - The user sent mass mailings to recipients, posing as someone they trust.
- Telecom-Related Fraud - The user runs a scan pumping traffic (artificially inflating call traffic), exploiting the price arbitrages created by policies of the Federal Communications Commission (FCC) International Revenue Share Fraud (IRSF).
- Other - Any other type of online fraud that is not covered in this enumeration.
- Use Case ID (optional) - The use case identifier that best applies to this event submission. Use the drop-down to choose the appropriate option.
- BACS - Prevent bulk account creation and spam
- BACF - Prevent bulk account creation and fraud
- CHBK - Prevent chargebacks
- ATCK - Prevent account takeover/compromise
- LEAD - Prevent false lead entry
- RESV - Prevent fake/missed reservations
- PWRT - Password reset
- THEF - Prevent identity theft
- TELF - Prevent telecom fraud
- RXPF - Prevent prescription fraud
- TRVF - Transaction Verification
- CLDR - Calendar Event
- SHIP - Shipping Notification
- OTHR - Other
- TOOL - UI Based Tool
- BTCH - Batch Submission Tool
- UNKN - Unknown/prefer not to say
- Date of Verification (optional) - If you verified the user's phone number, then you use this parameter to specify when.
Phone Number Details
Use the Phone Number Details section to provide information about when the phone number was associated with a user's account and when it was last verified.

The fields for this section are:
- Phone Number Incept Date (optional) - The date that this phone number was associated with this user account.
- Phone Number Last Valid Activity Date (optional) - The date that this phone number was last verified.
Email Details
If there is any email information associated with the user account you are submitting an event about, you enter it here.
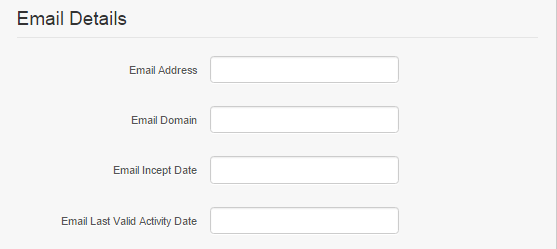
The fields for this section are:
- Email Address (optional) - The email address associated with this user account.
- Email Domain (optional) - If the email address is unknown, you can provide the domain instead.
- Email Incept Date (optional) - The date that the email address was associated with the user account.
- Email Last Valid Activity Date (optional) - The date that the email address was last verified.
Device Details
Use this section to provide information such as type of device and device ID.

The fields for this section are:
- Device ID (optional) - The device identifier associated with the transaction.
- Device ID Type (optional) - The type of device identifier used.
User Account Details
If you have details about the user account associated with the event you are submitting, enter them here.
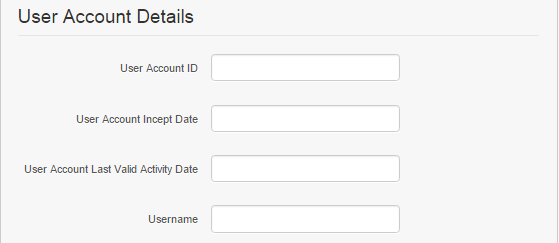
The User Account Details section includes the following fields:
- User Account ID (optional) - The user account ID associated with the phone number.
- User Account Incept Date (optional) - The date that the account was created.
- User Account Last Valid Activity Date (optional) - The date the last verified activity of the end user occurred on the customer's side.
IP Address Details
Use this section to provide details about the IP address associated with the event, if applicable.
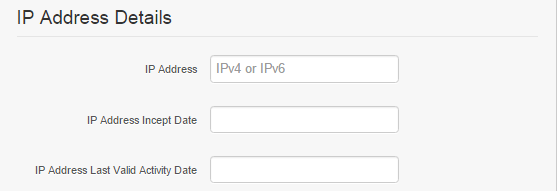
The fields for the IP Address Details section are:
- IP Address (optional) - You must present the IP address in the format defined by the Internet Engineering Task Force (IETF) in the Internet-Draft document titled Textual Representation of IPv4 and IPv6 Addresses.
- IP Address Incept Date (optional) - The date that the originating IP address was associated with the user account.
- IP Address Last Valid Activity Date (optional) - The date that the originating IP address was last verified.
Impact to Your Organization
Use the Impact to Your Organization section to indicate how the event affected your company.

The fields in the Impact to Your Organization section include:
- Impact Level (optional) -
-
- High - (>$10,000 USD) or (>10,000 users affected)
-
- Medium ($1000 - $10,000 USD) or (1,000 - 10,000 users affected)
-
- Low (<$1,000 USD) or (<1,000 users affected)
-
- Fraud Impact Type (optional) -
- Customer Experience - Degraded our website's response time or experience.
- Operational Overhead - Added load to our system resources.
- Revenue Loss - Theft of products or services.
- Other - An area not covered in this enumeration.
File Submissions field descriptions
On the Submit Labeled Data Events screen, on the File tab, there are a number of field requirements and formatting rules for creating the file you submit. You can read about the rules and requirements in the File Submissions box on the right side of the screen. If you do not have access to the screen but want to review the rules and requirements anyway, they are presented here for reference.
Formatting rules for file submissions
The formatting rules for file submissions are:
- File must be in CSV format
- File must include a header line followed by each labeled event in a new data line
- Header column names and sequence must not change
- Data lines can omit optional fields by adding a comma
An example file in Excel looks like this:

If you do not have information for one of the optional columns, you can leave the cell blank.
Required fields
The required fields for a file submission are:
- phone_number
- label
- telesign_reference_id or timestamp_utc
Optional fields
The optional fields for a file submission are:
- fraud_type
- ucid
- verified_date_utc
- phone_number_incept_date_utc
- email_address
- email_domain
- email_incept_date_utc
- email_last_activity_date_utc
- device_id
- device_id_type
- account_id
- account_incept_date_utc
- last_valid_activity_date_utc
- username
- ip_address
- ip_address_incept_date_utc
- ip_address_last_activity_date_utc
- impact_type
- impact
If you would like more information about what one of the fields means, refer to Single Submissions field descriptions. Each field is explained in detail there.
Date/Time Format
The date/time should be in the ISO 8601 format, for example 2014-10T07:33:04Z.
Label (label)
When submitting a label for your data, the label should be one of:
- good
- bad
- unknown
Telesign Reference ID (telesign_reference_id)
This is a 32-length UUID character string.
Use Case (ucid)
The description in the parentheses should not be included as part of the use case value. Please only include the 4-letter code.
- BACS (Prevent bulk account creation + spam)
- BACF (Prevent bulk account creation + fraud)
- CHBK (Prevent chargebacks)
- ATCK (Prevent account takeover/compromise)
- LEAD (Prevent false lead entry)
- RESV (Prevent fake/missed reservations)
- PWRT (Password reset)
- THEF (Prevent identity theft)
- TELF (Prevent telecom fraud)
- RXPF (Prevent prescription fraud)
- TRVF (Transaction Verification)
- CLDR (Calendar Event)
- SHIP (Shipping Notification)
- OTHR (Other)
- TOOL (UI Based Tool)
- BTCH (Batch Submission Tool)
- UNKN (Unknown/prefer not to say)
Fraud Type (fraud_type)
The fraud type can be one of:
- chargeback
- coupon
- harass
- identity_theft
- property_damage
- spam
- takeover
- telco
- other
Fraud Impact Type (impact_type)
The fraud impact type can be one of:
- customer_experience
- operational_overhead
- revenue_loss
- other
Impact (impact)
The impact can be one of:
- high
- medium
- low
Updated over 1 year ago