
Okta telephony - Telesign no-code inline hook
Use Telesign's no-code solution to send OTPs via SMS and voice
Effortlessly integrate with Okta using Telesign Okta telephony inline hook solution to deliver one-time passcodes (OTPs) via SMS and voice. Telesign offers easy migration and scalability for existing Okta customers choosing a new telephony service provider to send OTPs. This easy no-code solution discussed on this page will help you "bring-your-own-platform" to Okta, replacing Okta's previous internal platform for SMS and voice telephony. If you are new to Telesign and have not yet signed up for an account, contact us. We also offer the ability to code your own integration using our full-service APIs to deploy your own code.
Understand Okta telephony service changes
In August of 2023, Okta stopped offering out-of-the-box telephony services for new customers. Effective September 15, 2024, at time of renewal, all Okta customers must bring-their-own telephony provider via Okta’s telephony inline hook to continue to send SMS and voice messages for both multi-factor authentication (MFA) and non-MFA use cases (e.g. authentication, account unlock, and password reset).
Before their first post-September 15, 2024 renewal, Okta customers currently using SMS or voice provided by Okta must implement a bring-your-own telephony provider, such as Telesign, using your Okta telephony inline hook.
Telesign Okta telephony inline hook solution
The Okta telephony inline hook allows you to integrate your own custom code into Okta flows that send SMS or voice call messages. You can integrate this inline hook with Okta's enrollment, authentication, and recovery flows that involve phone authenticators. Okta uses an external provider, such as Telesign, to deliver the OTP to your end user. Status commands indicate if the delivery was successful.
For Okta customer who want to continue using verification over SMS and voice after September 15, 2024, Telesign is providing a simple solution that offers:
- Easy configuration using the Okta Admin console.
- Endpoint for Telesign Okta telephony inline hook.
- Delivery of verification messages over SMS or voice to end users.
- Synchronous response to Okta (success/error).
- Status callbacks for getting more insights of the delivery status of your transaction (Optional).
Basic usage
At a high-level, the following workflow occurs when using the Telesign Okta telephony inline hook solution:
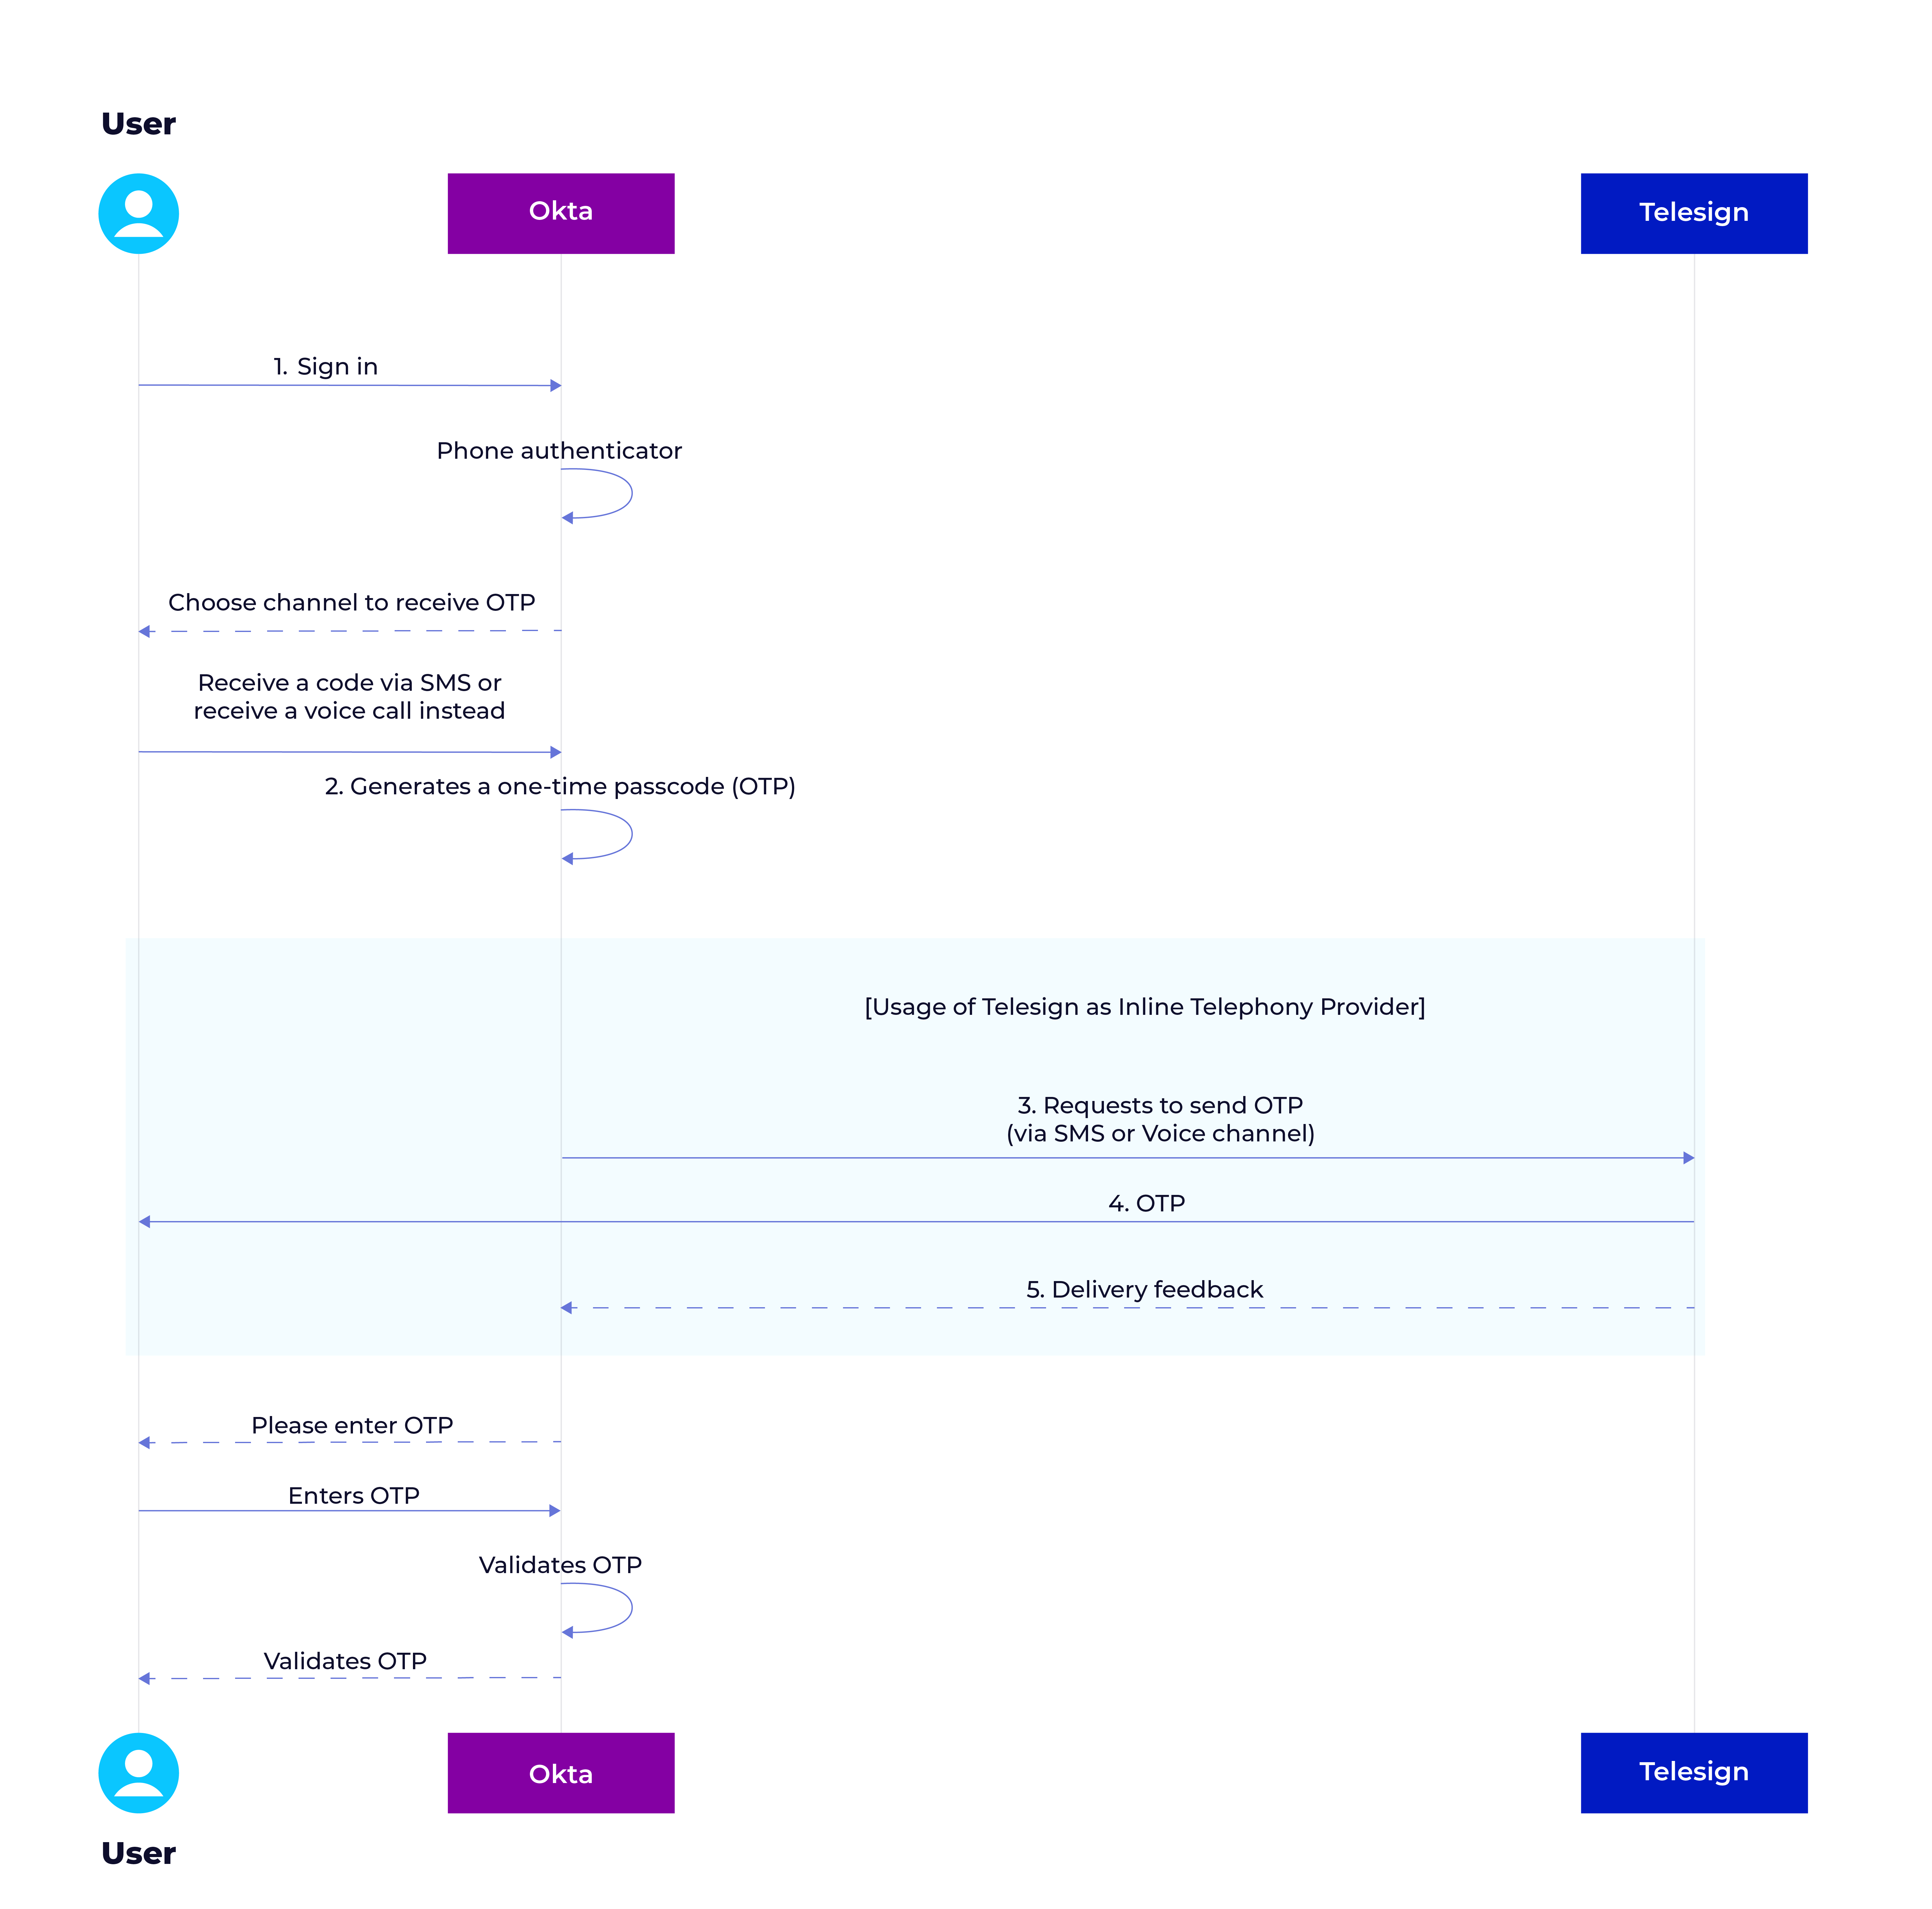
Telesign Okta inline hook solution workflow
- Your end user attempts to sign into your portal via Okta. You have an authentication requirement of a phone authenticator. The user selects "Receive a code via SMS" or "Receive a voice call".
- Okta generates a one-time passcode (OTP) and verifies if a telephony hook is configured and active for you. This OTP is valid for five minutes.
- A telephony inline hook is triggered and sends a request to Telesign to deliver the OTP.
- The Telesign Okta telephony inline hook service evaluates the request. If the request headers are valid, the OTP is sent to the end user's phone via SMS or through a voice call.
- Okta receives a response that indicates if the OTP was sent successfully.
NOTE:Okta enforces a rate limit to protect against brute-force attacks on the phone authenticator. If the user has entered incorrect credentials multiple times, the user is temporarily blocked from using the phone authenticator. The user can use the Verify with something else option to sign in using a different authenticator.
Overview - Configure your telephony inline hook
Complete the following steps to configure your Telesign Okta telephony inline hook properly:
-
Configure your Telesign account (This step is completed by Telesign Customer Support)
- Onboarding for SMS product
- Onboarding for Voice product
Step 1. Configure your Telesign account
When you contact us, request that our Customer Support team enable the following Telesign products in your account:
Messaging - Enabled.
- Okta Integration API - Enabled.
- Callback status - Enabled (Optional).
SMS - Enabled.
- Sender ID - Purchased from Okta or Telesign and enabled.
Voice - Enabled.
- Voice caller ID - Purchased from Okta or Telesign and enabled.
NOTE:A Sender ID is a dedicated phone number purchased from Telesign for SMS. This article has details on how to get a dedicated phone number. Similarly, customers interested in using voice can purchase a dedicated phone number from Telesign to use as a voice caller ID. Contact our Customer Support Team for assistance.
Step 2. Configure your Okta telephony inline hook
CAUTION:You are subject to all compliance rules as appropriate for your transaction. Note that each country has its own rules and regulations so please follow them carefully.
Before you begin
Make sure you have the following before you start:
-
Authentication credentials: Your Customer ID and API Key. If you need help finding these items, see How do I find my Customer ID and API Key.
-
Authorization secret for HTTP header: Follow these instructions for implementing basic authentication to generate the authentication secret for the HTTP header. See Basic authentication for more information.
-
Telesign Okta telephony inline hook endpoint:
https://rest-ww.telesign.com/integration/okta-hook. -
Okta Administration access privileges: Access to the Okta console including administration access privileges and the Okta Verify App on your mobile device to sign into the account are required.
-
Okta Phone authenticator: Configure the Okta phone authenticator in the Okta admin console using the "Add the phone authenticator" procedure listed on this page.
-
Add phone to the Okta enrollment policy: Go to Security in the Okta admin console and then select Authenticators. Select the Enrollment tab to add the authenticator to a new or an existing authenticator enrollment policy.
-
Understand the basic usage and end user experience: Review Basic usage and the paragraph titled "End-user experience" on Okta's Configure the phone authenticator page.
NOTE:Okta only allows one active telephony inline hook.
Follow these steps to configure your Telesign Okta telephony inline hook endpoint.
-
Sign into the Okta console using your administration access privileges.
-
Select Inline hooks from Workflow in the left sidebar.
-
Select Telephony as the type of hook from the Add inline hook menu.
-
Enter a descriptive name for the inline hook name in the Name field.
-
Enter
https://rest-ww.telesign.com/integration/okta-hookin the URL field. This is the new Telesign endpoint that you will use to receive hook events. -
Enter
Authorizationin Authentication field. -
Enter the Client Token in the Authentication secret field. Use this procedure to obtain your client token. Please ensure that the client token starts with the prefix "Basic " (the word "Basic" followed by a space) before the string you generated in this step.
-
Select Save. This activates your telephony inline hook.
Step 3. Preview and test your inline hook
Follow these steps to preview and test your Telesign Okta telephony inline hook after you have configured it.
-
Select Inline hooks from Workflow in the left sidebar of the Okta console.
-
Find the Active telephony inline hook created in the previous procedure (it is listed using the descriptive name that you previously gave it). Select Actions and then the Preview tab.
-
In the Configure inline hook request section of the Preview tab, enter the following information:
- data.userProfile: Enter the name of the end user who is the valid authenticator for the phone.
- requestType: Select MFA verification from the drop-down menu.
-
In the Preview example inline hook request section of the Preview tab, select Generate request. This generates the JSON request that Okta sends to Telesign Okta telephony inline hook endpoint.
-
In the JSON section of the Preview tab, Select Edit to edit the request. For example, you can edit the user profile or the phone number before sending the request (Optional).
-
In View service's response section of the Preview tab, select View response to display the response from your Telesign Okta telephony inline hook endpoint.
NOTE:An OTP is not generated if the telephony provider fails during the test.
Step 4. Understand responses to Okta’s request
During Inline hook testing, the View service's response section of the Preview tab in the Okta console displays the response from your Telesign Okta telephony inline hook endpoint. A SUCCESSFUL or an UNSUCCESSFUL status is sent to Okta.
Successful response
{
  "commands": [
    {
      "type": "com.okta.telephony.action",
      "value": [
        {
          "status": "SUCCESSFUL",
          "provider": "Telesign",
          "transactionId": "0123456789ABCDEF0123456789ABCDEF",
          "transactionMetadata": ""
        }
      ]
    }
  ]
}
Note that transactionId is your Telesign reference ID.
Unsuccessful response
{
  "error": {
    "errorSummary": "3110",
    "errorCauses": [
      {
        "errorSummary": "3110",
        "reason": "Invalid request",
        "location": "EN-US"
      }
    ]
  }
}
NOTE:Messaging callback service is an optional feature that is available if you want to receive asynchronous delivery statuses. Contact our Customer Support Team for assistance and to enable this feature.
Step 5. Customize your SMS message
You may customize the SMS message sent to the end user using this Okta procedure. Carefully note Okta's length, character type, and message length count limitations when customizing your SMS message.
Step 6. Understand the end user experience
Okta recommends that you review its documentation on the end user's experience and provide the end user with instructions on how to navigate that experience successfully.
Additional resources
Contact us
- Contact us to get started with integrating with Okta
- Get started with Telesign and create your trial account
Telesign Okta inline hook documentation
- Okta telephony - Generate authentication secret using API explorer
- Okta telephony - Write your own code for your Telesign inline hook
- Okta telephony - Send SMS and voice using Messaging
- Okta telephony - Supported languages for voice text-to-speech
- Okta telephony - Status codes
Documentation for related Telesign products
- Verify API - Telesign Verify API makes it easy for you to set up phone-based, multi-factor authentication (MFA) using multiple channels (SMS, WhatsApp, Viber, RCS, and email). Support for Silent Verify and Push Verify are also included.
- Messaging - Telesign Messaging is an omnichannel engagement product that allows you to enrich your messages with the advanced features provided by various channels including SMS, WhatsApp, Viber, RCS, MMS, and email.
- Intelligence - Telesign Intelligence helps identify potentially fraudulent activity by analyzing the transaction risk associated with a phone number.
- Phone ID - Telesign Phone ID allows you to get detailed and actionable global phone number and subscriber data intelligence to strengthen authentications, evaluate fraud risks, and enhance the user experience.
Additional Okta resources
Updated 4 months ago