
Messaging - Set up RCS for your account
NOTE:To add this product to your account, contact a Telesign expert. This product is available for full-service accounts only.
Overview
With Rich Communication Services (RCS), you can enrich user engagement by sending SMS messages with enhanced features. Follow the steps below to set up an RCS agent, the entity you will use to send RCS messages to your customers.
1. Identify technical point of contact
Choose one person in your organization to be Telesign’s technical point of contact for this integration.
2. Select test devices
Select one or more mobile devices for testing (Android only). Until the RCS agent goes live, it can only communicate with these test devices. You will need to provide the phone numbers for these test devices to our Customer Support Team in a later step.
NOTE:If you no longer want to receive messages from your RCS agent to a test device, send an email to our Customer Support Team asking us to remove that device. Include the phone number for the device in your email.
The platform doesn't delete messages sent by your agent that are in transit to, or stored on, the test device.
3. Provide RCS account details
Next, send the following additional items in an email to our Customer Support Team for your RCS agent.
3.1. Contact display items
These items are displayed in your customer’s mobile device contact for this RCS agent:
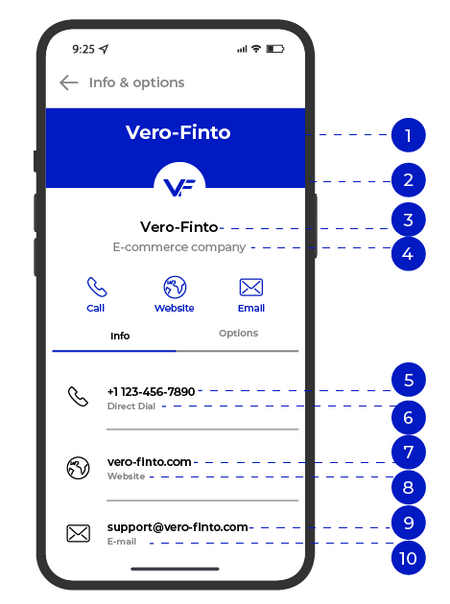
The contact display items that Customer Service needs for your RCS account details.
- Large banner image: URL for your hosted image to display at the top of the contact. Needs to be 1440 (w) by 448 pixels (h).
- Small logo image: URL for your hosted image to display over the large banner image. Needs to be 224 px by 224 px.
- Display name: Your company name as it appears in the contact.
- Description: Text of up to 100 characters describing either your company or this RCS agent.
- Phone number: Your number to display in the contact.
- Phone number label: Label text to display for this phone number. For example, “Direct Dial”.
- Website: URL for your website as it appears in the contact.
- Website label: Label text to display for this website URL. For example, “Website”.
- Email: The email address you want to appear in the contact.
- Email label: The label text to display for this email address. For example, “Email”.
3.2. Message display items
These items are used in messages to your customer from the RCS agent.
- Color: Hex number for a darker color to use for other design elements in RCS messages. Minimum 4.5:1 contrast ratio relative to white.
- Terms of service: URL for the web page with terms of service for customer interaction with your agent.
- Privacy policy: URL for the web page with your company’s privacy policy.
3.3. Approval point of contact
The employee at your organization who will provide approval of the finalized RCS agent. This does not need to be the same person as the technical point of contact mentioned earlier in this document.
For the approval point of contact, send us their:
- name
- job title
- email address
3.4 Agent ID
Your account will include one or more RCS Business Messaging (RBM) agents. You must provide us with an Agent ID that specifies each agent. Keep in mind the following limitations for the Agent ID:
- Do not exceed 20 characters in length.
- Use only lowercase for alphabetic characters.
- Use snake case (underscores) to separate words in the ID.
- Do not include hyphens ( - ).
4. Contact customer support
Once you have the above items ready, contact our Customer Support Team. They will work with you directly to fulfill the remaining setup steps.
Updated 4 months ago