
Flow Builder - Create a flow
NOTE:Select regional availability. This feature is currently available for customers with end users in select countries. To find out if this feature is available in your region, contact a Telesign expert.
This product is available for full-service accounts only.
Before using Flow Builder, use the Protect Platform to create (design) a flows in a no-code manner before using the API to run an integration.
Before you begin
Before you start using Flow Builder, make sure that the following have been completed first:
- Make sure Flow Builder is enabled for your account. Contact our Customer Support Team to enable this product.
- Make sure any Telesign products that will be used with Flow Builder are enabled. Contact our Customer Support Team.
- Review Flow Builder - Understand the Protect Platform before creating a new flow.
Start a flow
When you first access the Flow Builder section of the platform, the Flow Wizard appears in the draft mode of the editor to help you capture your flow’s basic setup. Use the Flow Wizard to define the flow name, the input fields the flow will work with, and mark which fields are required. These definitions drive built‑in validations and auto‑suggestions on nodes, align your team on what the flow expects, and help prevent common errors, so complete these four steps carefully before moving to the canvas.
Use the Edit tool in the Flow Wizard to define these fields:
1. Flow name
A clear, consistent name helps teammates quickly find, filter, and understand the purpose of your flow across lists, reports, and notifications. Aim for names that reflect the business objective, the channel used, and any scope such as region or audience. Add a prefix with the business process and region or channel when relevant.
- What it is: The human‑friendly name that appears in lists and reports.
- Good examples: KYC Verification – Retail LATAM, Password Reset – Email, Abandoned Cart - Sms.
2. Request parameters
These are the named inputs your flow relies on. They state what information must be provided when the flow is triggered (e.g., phone, email, message) and how it should look (format/type and whether it’s required). Defining them here makes the flow self‑documented for your team and ensures nodes can reference those values consistently later. These are the same fields the caller will later send inside a JSON object named dataToReplace.
- What they are: The input fields your flow expects. They will be provided by whoever triggers the flow, inside a JSON object named dataToReplace (the full API request is explained later).
- Where used: Nodes reference these values (e.g., a Service can include phone in its request body, and a Format node can validate whether a field is numeric or text).
- How to add: Select + or press Enter to create each parameter.
- Special flags: Mark which parameter is the Email and/or Phone. These act as internal identifiers consumed by specific nodes (e.g., Phone ID) that perform validations and lookups based on phone/email. Selecting the correct field ensures those nodes reference the right value.
- Common parameters
o name – Customer name.
o phone – E.164 format recommended (e.g., +573001112233).
o email – RFC‑compliant email.
o message – Free text for outbound notifications.
NOTE:Follow these recommendations when naming parameters.
- Keep names short and lowercase: userId, orderId, locale.
- Document expected format in the description (date format, country code, etc.).
- Don’t use spaces or special characters in parameter names.
3. Advanced (required fields)
Use this section to declare which inputs are mandatory for a valid trigger. Marking a field as required enforces the contract at the very beginning: before the flow runs, the platform checks that these fields are present (and not empty). If any are missing, execution is blocked and a clear error is returned. This protects downstream nodes and external services, keeps failures predictable, and sets the right expectations for the teams that will call the flow.
- What it is: A checklist of which parameters must be present in every request.
- What happens if missing: The API returns a 400 Validation error and the flow does not start.
- Recommendation: Only mark fields as mandatory if they truly are mandatory fields (e.g., phone, message).
- Example configuration
o Required: cellphone, message.
o Optional: email, name. - Why this matters: Clear choices reduce runtime errors. Decide required fields with your business stakeholders before activation.
4. Build flow
Select Build to to enable the flow creation view.
Add and configure services
After you have select Build, the draft view of the canvas to build a flow appears. The side menu on the right side contains the services, tools, and channels you will need for you flow. Use the tool tips to locate the second menu button for Services, which will allow you to select a service, drag and drop it into the diagram area of the draft view. There you can edit it by selecting on the pencil button. Each service has a button that allows you to view the details of each service. You can preview each service using the Icon on the right side of its name.
Once you have chosen and dragged the service to the diagram area, click on the Edit tool (pencil icon) to display the configuration fields in the Configuration tab:
- Node name: Add the name of the step/node that you will see in the editor once you have finishing configuring the service.
- Response type: Select a response type (this response was configured in the creation service step)
- Maximum response time: Select time waiting for the service to give you an answer.
- Session variables: Select the + icon to add key - value pairs for the service which are used to make decisions at later nodes of the flow. Enter the name the parameter in the Key field and its associated value in the Value field.
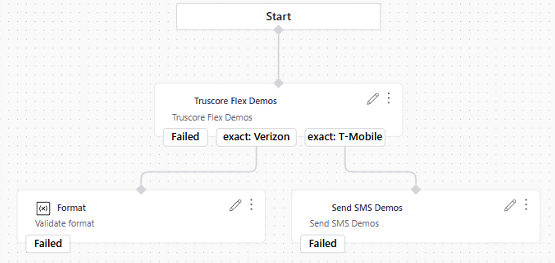
Add conditions
Once you have added and configured services, you need to add conditions. Select the Condition tab located next to the Configuration tab. Select Add condition and complete the following fields:
- Condition name: The name of the condition.
- Type condition: Select one of the options available in the drop-down list.
- Response to query: This shows the segment of the response, and the location from which the operator data will be extracted. In this location, it is possible that in each response a different operator is presented.
- Response value: In this field you must add the value from which the flow will continue once the condition is fulfilled, for example, that the flow will continue to the next node.
You can add more than one condition. Once you have configured the service, you select Continue. You will see the condition reflected on the service node as an output.
Select Save when you are done.
NOTE:You must have at least two nodes in order to continue after adding conditions.
Add tools
Use the tool tips in the side menu to locate Tools (tool icon). Unlike the tools used to manipulate items on the draft view, these Tools are nodes that serves as a dynamic decision-making unit within Flow Builder, which enables the configuration of custom business rules based on the outputs of integrated internal products. Like Services, you can select and drag them onto the draft view of the canvas for your flows. Some tools will correspond to Telesign products. The list below are tools that are not product-specific tools.
Format tool
This tool is for validation on parameter formatting. The following fields on the Configuration tab must be filled in:
- Step name: Name to identify the tool.
- Variable: Request parameter to be validated.
After you have completed adding information in the Configuration tab, select the Condition tab and select Add condition. See Add conditions for more information on adding conditions.
Segment Tool (Traffic split)
This tool gives the allows you to generate segments divided in percentages that you select. You can add more segments by selecting + Add segment. Complete these fields:
- Step name: Add a name to identify the tool on the editor view. A short, descriptive name is recommended.
- Segment recipients: Drag the slider to select the point to divide segment percentage.
- Name segments: Add a name to each of segments to identify them.
Select Save when you are done. you will see the node in the draft view of the editor.
Suggested uses of the segment tool
- Try a new message or provider with 10% of traffic.
- Send premium users (from a prior condition) to a different branch.
- Use it for A/B testing, phased rollouts, or distributing loads.
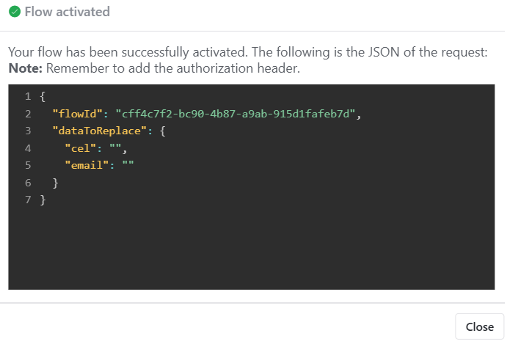
Flow activated
Once you have finished the flow creation, the JSON to use in your request is displayed. Copy and save this JSON request in a text editor so that you can use it when you Run, test, and validate the flow.
Updated 4 months ago