
Ping Telephony – Create custom OTP and ARN messages
NOTE:To add this product to your account, contact a Telesign expert. This product is available for full-service accounts only.
Telesign's API for SMS allows customers who are using Telesign as their telephony provider with PingOne to create customized one-time passcode (OTP) and ARN (alert, reminder, and notification) messages. Once Telesign is configured as a provider for use with PingOne, the message field will use a Ping notification template that you set up to customize the contents of the OTP or ARN message that you want to send to your end users.
Common use cases
Here are examples of common use cases for customized OTP and ARN messages that can be sent.
- Send a personalized OTP or SMS alert to an end user's phone number.
- Send a timely reminder to an end user's phone number such as password reset notification/confirmation.
- Send a personalized notification to an end user's phone number.
Examples of these use cases include:
- OTP messages that are customized with the end user's name.
- OTP messages that include a company name or security reminder.
- Account status change notifications such as password changes.
- Password Recovery notifications for end users who have forgotten their password and have started the Forgot password process.
- Strong Authentication notifications for end users setting up strong authentication.
- Transaction notifications for end users when strong authentication is required for transaction approval. For example, elevated security for a high value or high risk resource or service.
- Verification code notifications advising end users when verification codes are sent to the email address in the end user profile to verify an end user account.
NOTE:Only OTP and ARN (alert, reminder, and notification) messages sent via SMS may be customized. For simple templated SMS and voice OTP messages, please refer to Ping Telephony – Send OTP-only SMS and voice messages.
Basic Usage
At a high-level, the following workflow occurs when using the Telesign SMS API with PingOne when you bring Telesign as your PingOne provider.
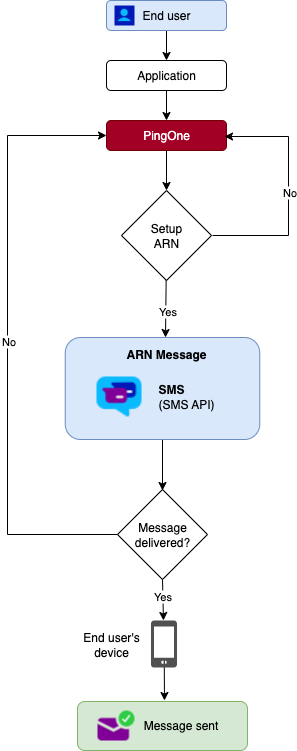
Step 1 - Configure your Telesign account
This step is completed by Telesign Customer Support who will assist you in onboarding for the correct Telesign product(s) that you need to integrate Telesign as your telephony provider. When you contact us, advise our Customer Support team that you want to send custom OTP or ARN messages with PingOne.
Ask Customer Support for assistance with the following tasks:
- Enable SMS (Telesign's API for SMS)
PLUS:
- Enable a Sender ID purchased from Telesign.
NOTE:You will not be able to use your legacy shared Sender ID from Ping Identity. You will need to purchase a dedicated phone number from Telesign to use as a Sender ID for SMS messages. This article has details on how to get a dedicated phone number. Contact a Telesign expert for assistance.
Step 2 - Locate your Telesign Authentication credentials
You will need to enter in your Telesign Authentication credentials before you configure Telesign as a provider in Ping's portal. These are your Customer ID and your API Key.
- Locate your Customer ID and API Key using the instructions on How do I find my Customer ID and API Key.
- In the Authorization section, enter your Customer ID as the User Name and enter your API Key as the Password.
Step 3 - Select a PingOne notification template
Follow the instructions in the PingOne Notification Templates section to select a PingOne notification template (Select User Experience → Notification Templates inside the PingOne portal). To send custom OTP and ARN messages using the SMS API API endpoint, you will need to select a PingOne template marked as being available for SMS. See Configuring a custom notification provider for PingOne for general configuration information. We recommend that you configure your notification template before you test your template but you may make adjustments to the notification template at any time during the setup process.
Step 4 - Configure and test the Telesign SMS endpoint
These instructions will help you navigate the PingOne platform as you set up Telesign as your telephony provider in the PingOne platform. The table below provides a list of the recommended values for each field when using Telesign's SMS endpoint with the PingOne platform. You can add additional fields by selecting + Add Key, Value for each additional field you need. You can also use the console to test the selected endpoint, which we recommend doing before using the endpoint.
URL: Use the POST https://rest-ww.telesign.com/v1/messaging endpoint (the Telesign SMS API).
| Field (Value) | Field (Value) | Notes |
|---|---|---|
| Body Select Form from the menu. | Add the key and value pairs listed below after selecting Form. | Select + Add Key, Value for each additional entry |
TypePOST | URLhttps://rest-ww.telesign.com/v1/messaging | Use this endpoint. |
Keyphone_number | Value${to} | Contains the end user's phone number with country code included. Avoid use of special characters and spaces. |
Keymessage | Value${message} | Contains the text of the message sent to the end user. You are limited to 160 characters. If you send a very long message, Telesign splits your message into separate parts. |
Keymessage_type | ValueARN OR OTP | We recommend using ARN as the message_type |
Headerscontent-type | Valueapplication/x-www-form-urlencoded |
After you set up these fields, select Send Test SMS and enter the country and test phone number along with your password. Select Send and then review the status or error messages in the lower right corner. Adjust or send again if adjustments are needed. Make sure to save your changes and fully test your setup before using using in your final integration.
Step 5 - Modify the PingOne notification templates
Use the instructions on PingOne - Notification templates to modify the notification templates. Once configured, the value for message will use the contents of the template to customize the message sent to the end user. For example, you can set up a template to insert an end user's name as well the OTP code in a message. Be sure to test your template and telephony provider configuration before using. The PingOne platform includes a testing button.
Step 6 - Next steps
-
When using the Telesign SMS endpoint for customized OTP or ARN messages, you can select the language of your choice in the Ping console. (This endpoint does not use a Telesign language table when using the PingOne platform).
-
See PingOne - Overview for more information on how to use and configure PingOne.
- See PingOne - Notification Policies) for more information on how to create a notification policy to limit the number of SMS and voice notifications that can be sent per day. You can also add a notification cooldown period during which users must wait before requesting another notification.
- See PingOne - Notification templates to modify the notification templates.
- See PingOne - Strong Authentication (MFA and PingOne - Build a custom sign-on policy for more information about authentication and custom sign-on policies.
CAUTION:You are subject to all compliance rules as appropriate for your transaction. Note that each country has its own rules and regulations so please follow them carefully.
Updated 4 months ago